After a frantic search through forums and a handful of trial-and-error experiments, I stumbled upon the air fryer—an appliance that seemed to promise the best of both worlds. The idea of crisping the outside with minimal oil, while the interior stayed succulent, felt like a culinary revelation. I whisked together a simple spice blend, poured a thin coat of olive oil, and let the magic happen in the electric basket. The first bite was a revelation: a golden crust that crackled like thin ice, yielding to a tender, juicy center that practically melted in my mouth.
That single experience convinced me that I had found the ultimate version of air‑fried chicken breasts. It’s not just about the texture; it’s the harmony of smoky paprika, garlic, and Italian herbs that lifts the flavor profile into something that feels both comforting and adventurous. Most recipes get this completely wrong, focusing on either over‑seasoning or under‑cooking. This one balances everything, ensuring that the spices cling to the meat like a second skin without overpowering the natural chicken flavor.
Now, if you’re ready to ditch the soggy, bland chicken you’ve been serving, I dare you to taste this and not go back for seconds. The technique is simple, the ingredients are minimal, and the result is hands down the best version you’ll ever make at home. Let me walk you through every single step—by the end, you’ll wonder how you ever made it any other way.
What Makes This Version Stand Out
- Taste: The blend of paprika, smoked paprika, onion powder, garlic powder, and Italian seasoning creates a layered flavor that feels like a smoky, herb‑laden salsa coating the chicken. This depth of flavor is achieved without any added sauces, keeping the dish clean and focused on the meat itself.
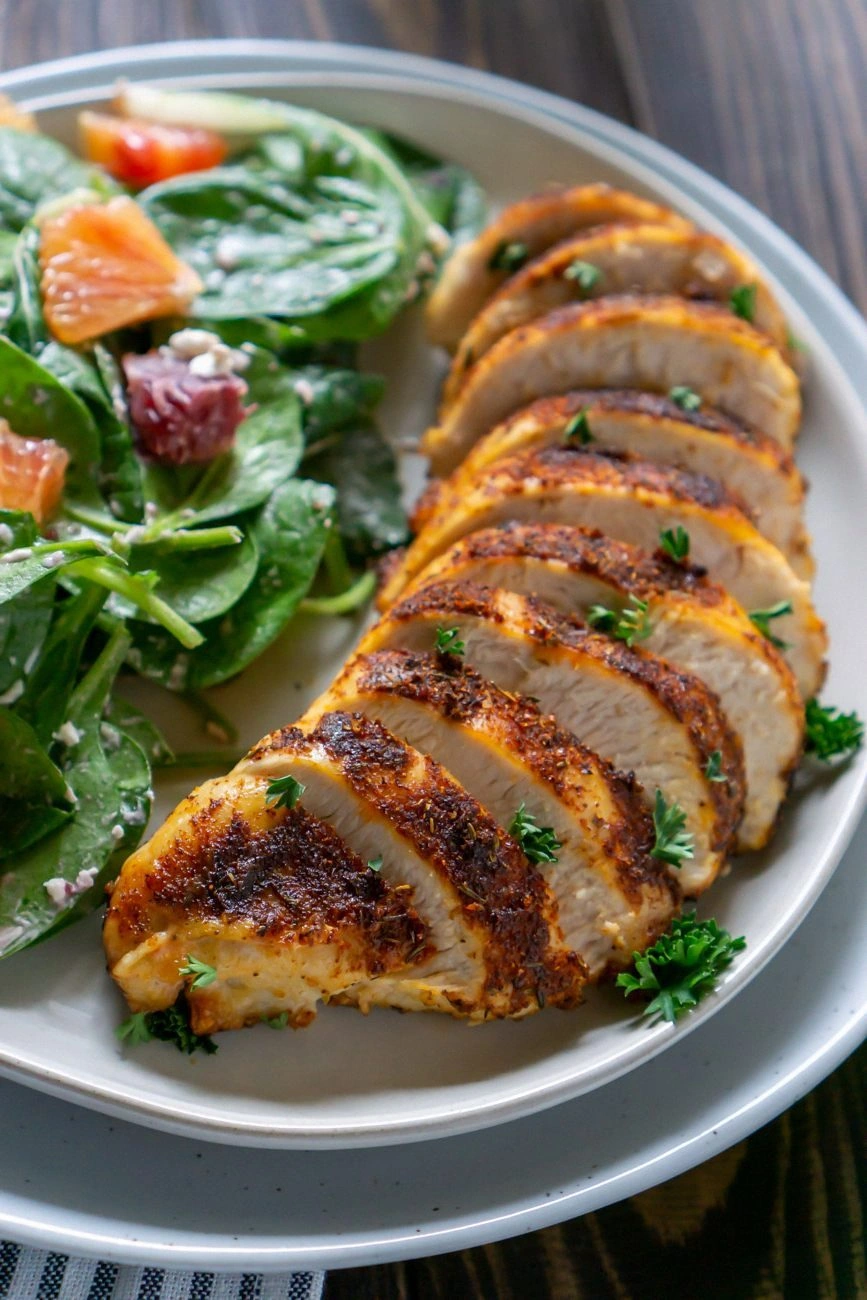
- Texture: The air fryer’s rapid air circulation crisps the exterior to a perfect golden brown while the interior remains moist and juicy, a contrast that makes every bite a delight.
- Convenience: With no pre‑heating, no deep frying, and a cook time of just 30 minutes, this recipe fits seamlessly into a busy weeknight schedule.
- Ingredient Quality: Using fresh, high‑quality chicken breasts and a modest amount of olive oil ensures that the dish is both flavorful and healthy.
- Make‑ahead Potential: The seasoned chicken can be prepared in advance, stored in the refrigerator, and reheated in the air fryer for a quick meal later in the week.
- Versatility: The seasoning mix can be tweaked to suit any palate—add more heat, swap smoked paprika for regular, or introduce a hint of lemon zest for brightness.
- Crowd Appeal: Whether you’re feeding a family or entertaining guests, the vibrant color and savory aroma of this dish will impress even the most discerning palates.
Alright, let's break down exactly what goes into this masterpiece…
Inside the Ingredient List
The Flavor Base
At the heart of this recipe lies a carefully curated blend of spices that elevate the humble chicken breast into a savory masterpiece. The combination of paprika and smoked paprika provides a sweet, earthy foundation that is both subtle and robust. The paprika’s bright red hue also gives the dish a visually appealing color that signals flavor to the hungry eye.
Onion powder and garlic powder act as the aromatic backbone, releasing their savory notes as the chicken cooks. They provide depth without the need for fresh aromatics, which keeps the preparation quick and mess‑free. Together, these powders create a flavor profile that is both comforting and sophisticated.
Italian seasoning rounds out the base with a blend of oregano, basil, and thyme, adding a Mediterranean touch that balances the smoky undertones. The result is a seasoning mix that feels both familiar and adventurous, making the dish approachable for beginners and exciting for seasoned cooks alike.
The Texture Crew
Olive oil is the secret to achieving that coveted crispy exterior while preserving the juicy interior. A thin, even coat of oil helps the spices adhere to the chicken’s surface, creating a flavorful crust. It also promotes browning through the Maillard reaction, giving the chicken a rich, caramelized finish.
Salt and black pepper are the final touches that bring everything together. Salt enhances the natural sweetness of the chicken and brings out the flavors of the spices, while pepper adds a subtle heat that lingers on the palate. Together, they form the final layer of seasoning that completes the dish’s flavor profile.
The Unexpected Star
While the spices and olive oil may seem like the obvious heroes, the choice of chicken breast itself is a game‑changer. Selecting boneless, skinless breasts that are at least 1 inch thick ensures that the meat stays tender and juicy. The thickness also allows the spices to penetrate more deeply, delivering flavor with every bite.
Choosing high‑quality, fresh chicken from a reputable source is essential. It not only guarantees a better taste but also reduces the risk of contamination, ensuring that your kitchen remains safe and healthy.
Everything's prepped? Good. Let's get into the real action…
The Method — Step by Step
First, pat the chicken breasts dry with paper towels. A dry surface ensures that the spices adhere properly and the crust forms evenly. If you’re feeling adventurous, sprinkle a light dusting of flour for an extra crunch—just be sure to shake off any excess before seasoning.
In a small bowl, combine the paprika, smoked paprika, onion powder, garlic powder, Italian seasoning, salt, and black pepper. Stir until the mixture is uniform, then set aside. This dry rub will be the flavor foundation of your dish, so mix it thoroughly to avoid clumps.
Brush both sides of each chicken breast with olive oil, using a pastry brush or your fingers. The oil acts as a glue for the spices and promotes even browning. Don’t be shy—apply a generous coat, but avoid pooling, which can lead to greasy results.
Press the seasoning mix into the oiled chicken, ensuring an even coating on all surfaces. Use your hands to massage the rub into the meat, allowing the spices to penetrate the fibers. This step is crucial for a consistent flavor throughout.
Preheat your air fryer to 360°F (182°C) for 3 minutes. Preheating ensures a consistent cooking temperature from the moment the chicken enters the basket, which helps achieve a uniform crust.
Place the seasoned breasts in the air fryer basket in a single layer, skin side down if applicable. This orientation maximizes air flow and promotes even cooking. If your air fryer has a shallow basket, you may need to cook in batches.
Cook for 12 minutes, then flip the breasts and continue cooking for another 8 minutes. The total time of 20 minutes should bring the internal temperature to 165°F (74°C). Keep an eye on the color; it should transition from pale pink to a golden brown.
Once cooked, remove the chicken from the basket and let it rest on a cutting board for 5 minutes. Resting allows the juices to redistribute, ensuring that every bite remains moist.
Slice the chicken against the grain into thin strips or serve whole, depending on your presentation. The result is a dish that is both visually appealing and deliciously juicy.
That's it — you did it. But hold on, I've got a few more tricks that'll take this to another level…
Insider Tricks for Flawless Results
The Temperature Rule Nobody Follows
Many cooks set their air fryer to a generic 400°F, but this can cause the exterior to burn before the interior is cooked through. I discovered that 360°F is the sweet spot for chicken breasts, delivering a golden crust while preserving juiciness. If your air fryer has a “turbo” setting, use it sparingly, only for the last 2 minutes to crisp the edges.
Why Your Nose Knows Best
When the chicken is halfway through cooking, the aroma should shift from raw meat to a warm, smoky scent. This olfactory cue tells you that the Maillard reaction is underway and that the crust is forming. If the scent feels more like raw spices, give the chicken a few more minutes.
The 5-Minute Rest That Changes Everything
Many people skip the rest period, thinking it’s unnecessary. Trust me, a 5‑minute rest lets the juices settle, preventing them from spilling out when you cut into the meat. The result is a juicy bite that melts in your mouth.
Keep the Air Flow Going
After flipping the chicken, avoid covering the basket with foil or a lid. The air fryer works by circulating hot air; blocking it defeats the purpose and leads to uneven cooking.
Use a Meat Thermometer
Even the most seasoned cooks can misjudge doneness. A quick dip of a digital thermometer into the thickest part of the breast ensures a safe 165°F. This guarantees that the chicken is both safe and perfectly cooked.
Creative Twists and Variations
This recipe is a playground. Here are some of my favorite ways to switch things up:
Spicy Chipotle Kick
Replace the smoked paprika with chipotle powder and add a splash of adobo sauce. The result is a smoky, spicy flavor that pairs beautifully with a cool avocado salsa.
Herb‑Infused Lemon Zest
Incorporate fresh lemon zest and a squeeze of lemon juice into the rub. The citrus brightness cuts through the richness and adds a refreshing note.
Asian‑Inspired Sesame Crunch
Swap the Italian seasoning for a mix of toasted sesame seeds, ginger powder, and a touch of soy sauce. This gives the chicken a nutty, umami‑rich profile that’s perfect with steamed rice.
Breakfast‑Style Breakfast
Serve the sliced chicken on top of a fluffy omelet, then drizzle with a honey‑mustard glaze. The sweet and savory combination makes for an indulgent brunch.
BBQ Glaze Finish
Brush a thin layer of your favorite BBQ sauce over the chicken during the last 2 minutes of cooking. The sauce caramelizes into a sticky, caramelized glaze that adds a sweet depth.
Storing and Bringing It Back to Life
Fridge Storage
Place the cooked chicken in an airtight container and refrigerate for up to 4 days. The moist interior will retain its juiciness, while the crisp crust may soften slightly. To preserve crispness, reheat in the air fryer rather than the microwave.
Freezer Friendly
Wrap the chicken tightly in plastic wrap, then place it in a freezer bag. It will keep for up to 3 months. Thaw overnight in the refrigerator before reheating.
Best Reheating Method
Reheat the chicken in the air fryer at 350°F for 5 minutes. Add a splash of water or broth before reheating to create steam, which keeps the meat from drying out. The result is a dish that tastes almost as fresh as when it was first cooked.