I remember the night I tried to make a pie crust for the first time and ended up with a soggy, crumbly mess that looked more like a pancake than a pastry. The kitchen smelled like melted butter and disappointment, and my friend laughed so hard she could barely breathe. That moment became the catalyst for a relentless pursuit of the perfect crust, a quest that has now culminated in a foolproof recipe that will leave your friends asking for the secret. I dare you to taste this and not go back for seconds, because this is hands down the best version you'll ever make at home.
Picture yourself pulling a golden, flaky shell out of the oven, the whole kitchen smelling incredible and the crust crackling like fresh snow under your fingers. The first bite is a buttery, slightly sweet bite that melts in your mouth, revealing a delicate, airy interior that feels like a cloud. The contrast between the crisp edges that shatter like thin ice and the soft, pillowy center is nothing short of poetry. I’ve spent hours experimenting, tweaking ratios, and testing techniques until the crust came out consistently perfect, and I’m ready to share every detail with you. If you've ever struggled with this, you're not alone — and I've got the fix. The secret lies in the simple ingredients and the precise timing that I’ll walk you through step by step.
This recipe isn’t just a set of instructions; it’s a philosophy that celebrates the marriage of texture, flavor, and technique. I’ll show you how to use the right flour, the correct butter temperature, and the exact amount of water to achieve the ideal flaky layers. Most recipes get this completely wrong, focusing on either too much flour or too little moisture, resulting in a dense or soggy crust. By contrast, this version works with a single batch of ingredients, no fancy gadgets, and a few kitchen hacks that I’ve learned the hard way. The result is a crust that rises, flattens, and crisps perfectly, no matter whether you’re baking a savory quiche or a sweet apple pie.
I’ll also reveal a technique that will change the way you think about butter in dough: cutting it into cubes rather than shreds, and the importance of keeping it cold. I’ll describe the tactile feel of the dough as it comes together, the subtle scent of toasted flour, and how to recognize when the dough is ready to roll. This is pure magic, and you’ll feel like a pastry wizard when you master it. Stay with me here — this is worth it. By the end, you’ll wonder how you ever made it any other way.
But before we dive into the how-to, let’s break down why this recipe is so special. The ingredients are humble, the steps are straightforward, and the outcome is a crust that looks and tastes like it’s been made in a professional kitchen. I’ll give you the inside scoop on each component, the science behind the texture, and the subtle tweaks that elevate the flavor. Ready? Let’s get started.
What Makes This Version Stand Out
- Flake: The butter is cut into cubes that stay distinct, creating layers that puff beautifully when baked. Each bite releases a buttery aroma that lingers on the palate.
- Texture: The dough achieves a perfect crumbly yet cohesive consistency, thanks to the precise balance of flour and ice water. It rolls out smoothly without tearing.
- Speed: The entire process takes less than 45 minutes from start to finish, making it ideal for weeknight desserts or last‑minute appetizers.
- Versatility: Works equally well for sweet pies, savory quiches, and even mini tarts. The neutral flavor base allows any filling to shine.
- Reliability: Even novice bakers can achieve consistent results, because the method eliminates common pitfalls like overmixing or under‑chilling.
- Flavor: A touch of sugar balances the salt, giving the crust a subtle sweetness that complements both sweet and savory fillings.
- Make‑ahead: The dough can be prepared up to 24 hours in advance, refrigerated or frozen, and still perform flawlessly.
- Clean‑up: No greasy pans, no sticky dough on the counter—just a few simple steps and a clean kitchen.
Alright, let's break down exactly what goes into this masterpiece...
Inside the Ingredient List
The Flour Foundation
Flour is the backbone of any crust, providing structure and the canvas for the buttery layers. I use 2.5 cups of all‑purpose flour because it offers the right balance of protein for a tender crumb without being too heavy. If you use a higher protein flour, the crust can become tough; if you use a lower protein, it may not hold its shape. Skipping flour entirely would mean no structure, and the crust would collapse under the filling.
When selecting flour, look for a brand with consistent texture and no additives. A fine, sifted flour ensures that the dough feels smooth and rolls out easily. You can also experiment with a blend of pastry flour and all‑purpose to tweak the crumb, but keep the total weight the same.
One common mistake is to over‑measure flour, which results in a dry, crumbly dough that doesn't hold together. Use a kitchen scale for accuracy, or spoon the flour into the measuring cup and level it off. This ensures the dough will be moist enough to hold the butter pieces without becoming gummy.
The Butter Brigade
Butter is the star that brings flavor and flakiness to the crust. I recommend using one cup of unsalted butter, chilled to the point that it still feels firm to the touch. Unsalted butter gives you control over the salt content and prevents an overly salty crust.
Cutting the butter into cubes rather than shreds is key; it allows the butter to be evenly distributed and to melt in tiny pockets during baking. If you cut the butter into shreds, the pieces may fuse together, resulting in a greasy crust. A small trick is to keep the butter in the freezer for a few minutes before cutting to make the process easier.
If you’re short on time, you can use a pastry blender or two forks to quickly cut the butter into the flour. Just be careful not to over‑mix, as that will develop gluten and toughen the dough. The butter should feel cold but pliable, not hard as a block.
The Sweet Whisper
The 1 tablespoon of granulated sugar adds a subtle sweetness that balances the salt and enhances the buttery flavor. It also helps to crisp the crust slightly by caramelizing during baking. Skipping the sugar will produce a more savory crust, which can be fine for certain pies, but the extra depth of flavor is worth the small amount.
If you prefer a sweeter crust, you can increase the sugar to 1½ tablespoons, but be careful not to add too much, as it may cause the crust to brown too quickly. For a more rustic, less refined crust, you can omit the sugar entirely, but the result will be less complex.
The Liquid Touch
The ½ cup of ice water is the final glue that binds everything together. The cold water helps keep the butter from melting prematurely, preserving those flaky layers. Adding the water gradually allows you to feel the dough’s texture and adjust as needed.
If you use room‑temperature water, the butter will start to melt, and the dough will become sticky and hard to work with. If you use too much water, the dough will be wet and won't hold its shape. The ice water is a precise way to achieve the right consistency.
A quick tip: if the dough feels dry after adding water, sprinkle a few more ice cubes, or if it feels too wet, add a tablespoon of flour. This fine-tuning ensures the dough is just right.
Everything's prepped? Good. Let's get into the real action...
The Method — Step by Step
- In a large bowl, whisk together 2.5 cups of all‑purpose flour, 1 teaspoon of salt, and 1 tablespoon of granulated sugar. This creates a uniform base that ensures every bite has the same flavor profile. Make sure the mixture is smooth before adding butter. The aroma of dry flour should already hint at the buttery finish to come. Keep the bowl covered while you work with the butter.
- Place 1 cup of unsalted butter in the freezer for about 5 minutes, then cut it into 1‑inch cubes. The cold butter is essential for flaky layers. If the butter is too soft, it will spread into the flour and create a greasy crust. This step is quick but crucial. The cubes should feel firm to the touch.
- Add the butter cubes to the flour mixture. Using a pastry blender, two forks, or your fingertips, cut the butter into the flour until the mixture resembles coarse crumbs with some pea‑size pieces. The goal is to keep the butter intact in small pockets. Don’t over‑mix; the dough should look like a sandy beach. The butter’s color will give you a visual cue that you’re on track.
- Drizzle ½ cup of ice water over the mixture in small increments, mixing gently after each addition. The water should be added slowly, allowing the dough to come together. If the dough feels dry, add a few more ice cubes; if it feels wet, sprinkle a tablespoon more flour. The dough should form a ball that holds together but is still slightly tacky. Avoid turning the dough on a flat surface too often.
- Gather the dough into a ball, flatten it into a disk, wrap it in plastic, and refrigerate for at least 30 minutes. This chilling step is non‑negotiable; it relaxes the gluten and keeps the butter cold. The dough should feel firm and cool to the touch after refrigeration. If you’re short on time, 15 minutes will still work, but the crust may not be as flaky.
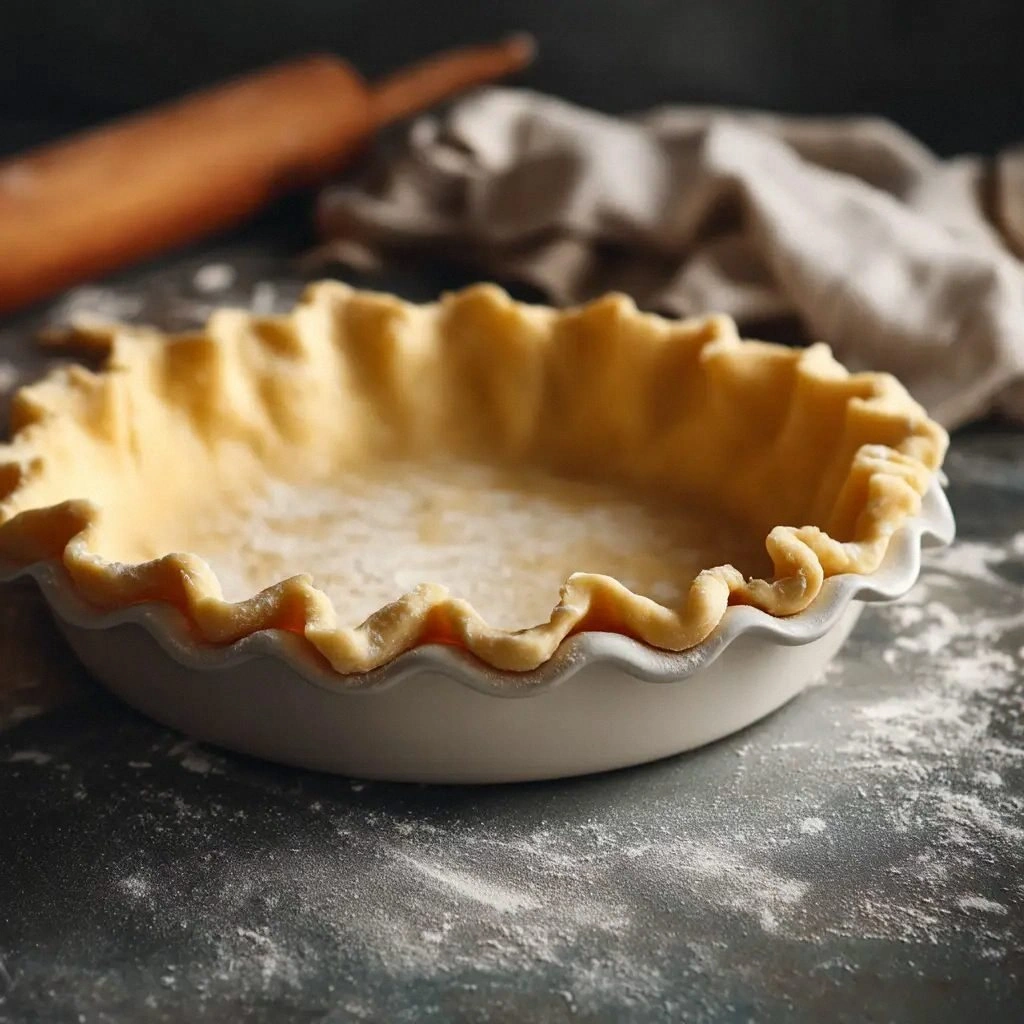
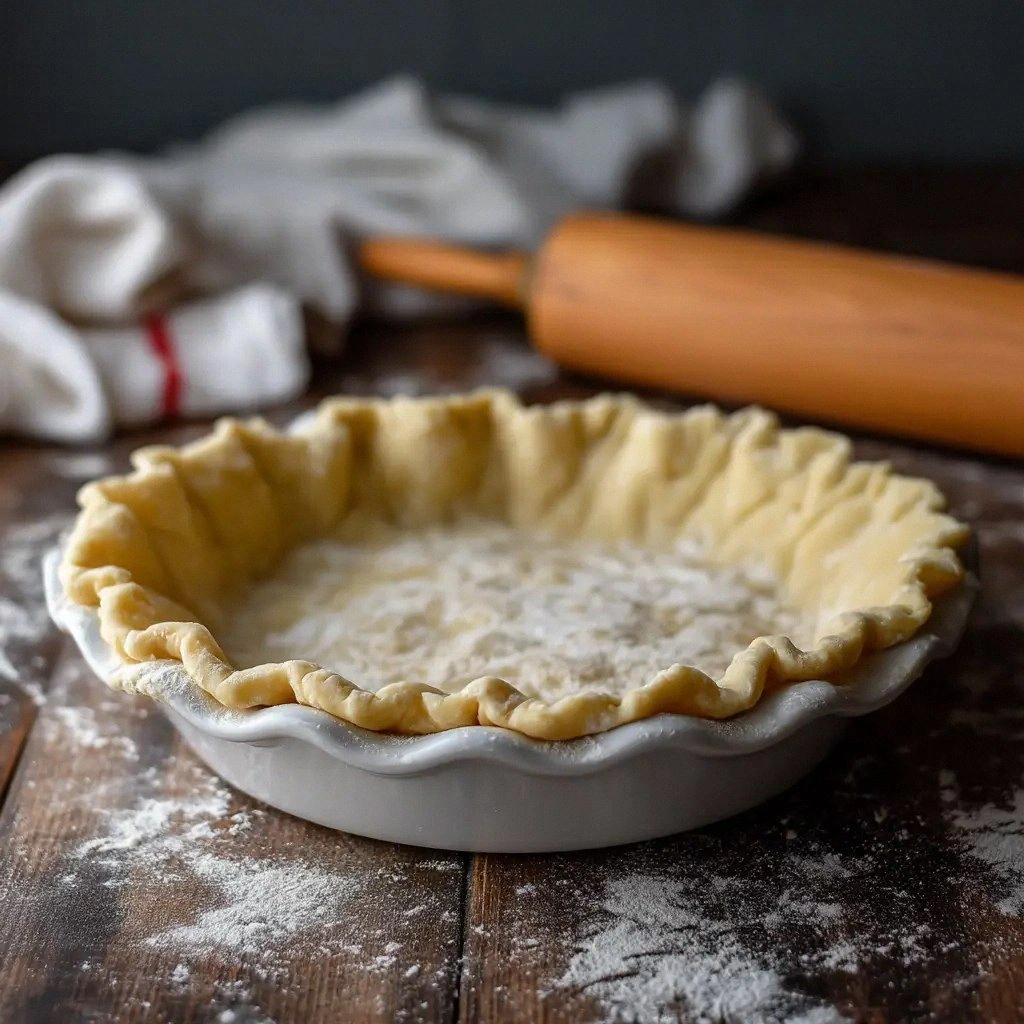
- On a lightly floured surface, roll out the chilled dough to a 12‑inch circle, rotating as needed to maintain an even thickness. The dough should not stick to the surface; a light dusting of flour will help. If the dough cracks, fold it back into a ball, chill again, and try rolling out again.
- Transfer the rolled dough to a 9‑inch pie pan, gently pressing it into the bottom and up the sides. Trim any excess dough with a knife or pizza cutter, leaving about ½ inch overhang. This ensures a neat, professional look. The crust should sit flat against the pan; if it’s too high, the filling may spill over.
- Prick the bottom of the crust with a fork to prevent bubbling, then chill the crust again for 15 minutes. The pricking allows steam to escape, preventing a soggy bottom. This step is especially important for pies with wet fillings. If you’re baking a savory quiche, you can skip the second chill; the crust will still be fine.
- If your pie requires a pre‑bake, line the crust with parchment paper and fill with pie weights or dried beans. Bake at 375°F for 15 minutes, then remove the weights and bake for an additional 5 minutes until the crust is golden. This ensures a crisp, fully cooked base before adding the filling.
- Add your chosen filling, whether it’s a fruit compote, custard, or savory mixture, and bake according to the filling’s instructions. The crust should maintain its structure, and the edges should turn a beautiful golden brown. Keep an eye on the crust during the last few minutes to avoid over‑browning.
- Once the pie is done, allow it to cool on a wire rack for at least 30 minutes before slicing. This cooling period lets the filling set and the crust firm up, making slicing clean and precise. The aroma of freshly baked crust will linger, making you feel proud of your culinary achievement.
That's it — you did it. But hold on, I've got a few more tricks that'll take this to another level...
Insider Tricks for Flawless Results
The Temperature Rule Nobody Follows
Many bakers think room‑temperature butter is fine, but the difference between cold and room‑temperature butter can mean the difference between flaky and flat. Keep the butter in the freezer until you’re ready to cut it; this ensures it stays firm and creates distinct layers during baking. If you’re in a hurry, a quick dip in ice water can chill the butter enough to preserve flakiness.
Why Your Nose Knows Best
The aroma of the dough is a reliable indicator of progress. As the butter starts to melt, you’ll smell a warm, buttery scent that signals the crust is ready for the next step. If the dough smells raw, it’s still too cold; if it smells like it’s been baked for a long time, it’s over‑mixed.
The 5‑Minute Rest That Changes Everything
After forming the dough ball, let it rest for 5 minutes before rolling. This brief rest allows the flour to fully hydrate, making the dough easier to work with. It also gives the butter a chance to firm up slightly, preventing it from sliding into the flour.
The Secret to a Cracked‑Free Bottom
If you’re baking a pie with a watery filling, line the crust with parchment and bake it on a rack for 10 minutes before adding the filling. This pre‑bake removes excess moisture from the crust, preventing sogginess. The result is a crisp, golden base that holds up under any filling.
The One‑Touch Trick for Even Layers
Use a bench scraper to lift the dough instead of a rolling pin. This gentle technique preserves the butter layers and keeps the dough from sticking to the surface. It also helps maintain an even thickness across the entire crust.
Creative Twists and Variations
This recipe is a playground. Here are some of my favorite ways to switch things up:
Herb‑Infused Crust
Add 1 teaspoon of dried thyme or rosemary to the flour mixture. The herbs give a savory depth that pairs wonderfully with chicken pot pies or spinach quiches. Keep the herb amount modest so it doesn’t overpower the buttery base.
Chocolate‑Dusted Crust
Sprinkle 2 tablespoons of cocoa powder into the flour before adding butter. This gives the crust a subtle chocolate flavor that works beautifully with fruit pies or a chocolate cream filling. The cocoa also adds a slight bitterness that balances the sweetness of the filling.
Citrus‑Zest Crust
Grate 1 tablespoon of lemon or orange zest into the flour. The citrus aroma elevates the crust, making it feel fresh and bright. This variation is perfect for fruit pies or a light custard.
Nut‑Rich Crust
Replace ¼ cup of the flour with finely chopped walnuts or pecans. The nuts add crunch and a nutty flavor that complements apple or pecan pies. Make sure to pulse the nuts lightly so they don’t become too coarse.
Gluten‑Free Version
Swap the all‑purpose flour for a 1:1 gluten‑free blend that contains xanthan gum. The gum replaces gluten’s structure, allowing the crust to hold together. Keep the butter cold and the dough chilled to maintain flakiness.
Savory Herb & Cheese Crust
Add ½ cup of shredded sharp cheddar and 1 teaspoon of dried oregano to the flour mixture. The cheese melts into the crust, adding a savory umami punch. This crust works well for quiches or savory pies.
Storing and Bringing It Back to Life
Fridge Storage
Store the dough in an airtight container in the refrigerator for up to 24 hours. The cold environment keeps the butter firm, preserving flakiness. When ready to use, let the dough sit at room temperature for 10 minutes before rolling.
Freezer Friendly
Wrap the dough tightly in plastic wrap and place it in a freezer bag. It can be frozen for up to 3 months. Thaw overnight in the refrigerator, then let it sit at room temperature for 15 minutes before rolling. The dough will still be flaky after freezing.
Best Reheating Method
To reheat a baked pie, preheat the oven to 350°F and place the pie on a baking sheet. Bake for 10 minutes or until the crust is heated through. Add a splash of water to the bottom of the pan to create steam, which keeps the crust from drying out. Let it rest for 5 minutes before serving.