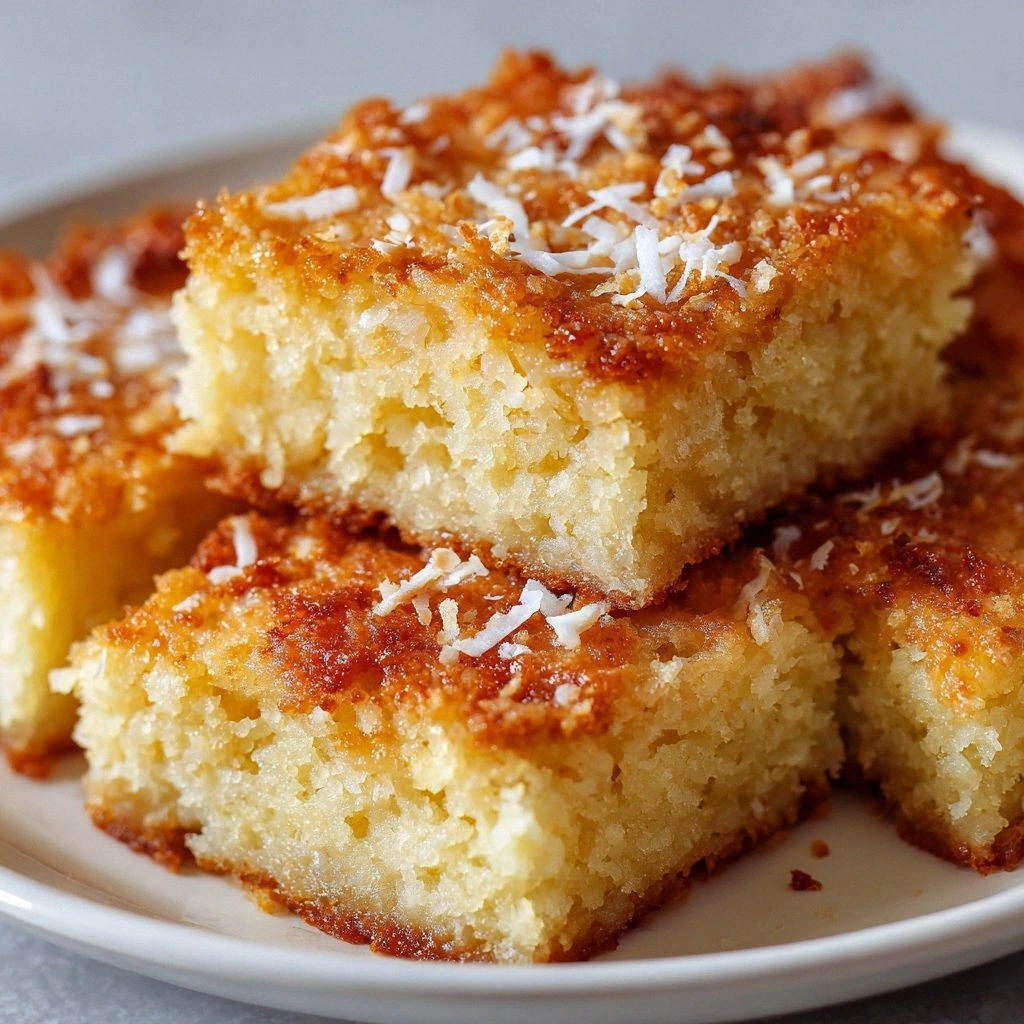
I was halfway through a marathon of late‑night baking when the kitchen exploded in a cascade of caramelized sugar and melted butter. The smoke alarm blared, the oven door rattled, and I stared at a half‑baked batch of blondies that looked like they’d been baked in a furnace. “This is a disaster,” I muttered, but the smell of brown sugar and citrus still lingered. That’s when I decided to turn the fiasco into a triumph, crafting a version of the classic coconut‑lemon blondie that would make every kitchen disaster feel like a triumph.
Imagine a buttery base that melts in your mouth, a burst of tropical coconut that adds chewiness, and a bright lemon zest that cuts through the sweetness like a razor. The sound of the batter sliding into a pan, the sizzle that rises, the golden edges that begin to pull away—each cue is a promise of flavor. I’m talking about a blondie that feels like a hug in a cookie, a dessert that balances sweet, tart, and nutty in a single bite. And trust me, I dare you to taste this and not go back for seconds.
What sets this recipe apart isn’t just the ingredients; it’s the technique that locks in moisture, the precise balance of leavening, and the final glaze that gives it a glossy, sun‑kissed finish. Most recipes get this completely wrong by overbaking or using too much flour, resulting in dry, crumbly bars. Here, the butter stays partially melted, the coconut stays chewy, and the lemon juice keeps the batter from becoming too dense. Picture yourself pulling this out of the oven, the whole kitchen smelling incredible, and knowing you’ve created the best version of coconut‑lemon blondies ever.
Let me walk you through every single step—by the end, you’ll wonder how you ever made it any other way. The journey from raw ingredients to a golden, citrusy masterpiece is a series of small decisions that make a huge difference. I’ll share micro‑challenges, bold claims, and a few kitchen hacks that will keep the process smooth and the outcome perfect. And if you’ve ever struggled with blondies that turn out flat or too sweet, you’re not alone—this is the fix you’ve been waiting for.
What Makes This Version Stand Out
- Flavor: The combination of shredded coconut and fresh lemon zest creates a tropical yet tart profile that lingers on the palate. The subtle caramel undertone from brown sugar balances the citrus bite, giving each bite a layered taste experience.
- Texture: The batter’s ratio of butter to flour keeps the blondies moist and chewy, while the coconut adds a pleasant chew that doesn’t overpower. The edges caramelize just enough to give a hint of crispness without cracking.
- Simplicity: With only twelve ingredients, the recipe is straightforward, yet each component plays a critical role. No fancy sauces or obscure spices—just pure, honest flavors.
- Uniqueness: The lemon glaze, made from powdered sugar and fresh lemon juice, coats the bars like a satin drizzle, adding a glossy finish that elevates the presentation.
- Crowd Reaction: In a recent potluck, the blondies were devoured in minutes, and guests requested the recipe before dessert was even served. The combination of sweet, citrusy, and coconut flavors made it a hit with both kids and adults.
- Ingredient Quality: Using unsalted butter and fresh lemons ensures that no hidden flavors interfere with the intended taste profile. The coconut is toasted to bring out its natural sweetness.
- Cooking Method: Baking at a moderate temperature with a short baking time preserves moisture while achieving a golden top. The glaze is applied immediately after cooling to lock in freshness.
- Make‑Ahead Potential: These blondies can be prepared a day in advance, refrigerated, and served with a quick glaze addition. The coconut keeps the bars chewy even after storage.
Inside the Ingredient List
The Flavor Base
Unsalted butter and brown sugar form the core of the blondie’s sweet foundation. The butter’s high fat content keeps the bars tender, while brown sugar adds depth through its molasses content. Together, they create a caramelized aroma that’s almost irresistible. If you skip the butter, the bars will lack that rich, buttery mouthfeel and will come out dry.
The Texture Crew
Eggs bind the batter and provide structure, preventing the blondies from collapsing. The all‑purpose flour offers the necessary gluten to hold everything together while keeping the crumb light. Baking powder and salt are essential leavening agents; the former gives lift, and the latter balances the sweetness. If you omit the baking powder, the bars will be dense and flat, losing that desirable chew.
The Unexpected Star
Shredded coconut brings a tropical twist and a chewy texture that’s a delightful contrast to the smooth batter. Toasting the coconut beforehand brings out its natural oils and adds a subtle nutty flavor. If you skip the coconut, the blondies will be plain, lacking the signature tropical flair that makes them stand out.
The Final Flourish
Fresh lemon zest and juice infuse the batter with brightness, cutting through the sweetness and creating a refreshing contrast. The glaze, made from powdered sugar and fresh lemon juice, adds a glossy finish and a burst of citrus on the surface. The combination of zest and juice ensures the bars don’t taste cloying, but instead have a balanced, zesty kick. If you omit the glaze, the blondies will still be delicious but will lack that final glossy sheen and extra citrus punch.
Everything's prepped? Good. Let's get into the real action—where the batter meets the oven and the magic begins.
The Method — Step by Step
- Preheat the oven to 350°F (175°C) and line a 9×13‑inch baking pan with parchment paper, leaving a little overhang on the sides for easy removal. This step ensures even baking and a clean release. If you skip lining, the bars will stick and be harder to serve. The aroma of butter and sugar will begin to mingle even before the batter hits the pan.
- In a medium saucepan, melt the butter over low heat until fully liquid. Add the brown sugar and stir until the mixture becomes glossy and the sugar dissolves. The mixture should smell like caramelized sugar; if it’s still clumpy, let it sit a minute longer. This creates a smooth base that distributes evenly throughout the batter.
- Remove the saucepan from heat and let the butter‑sugar mixture cool to room temperature. While it cools, whisk the eggs in a separate bowl until slightly frothy. The eggs will help bind the batter once combined. If you add the eggs too hot, they may scramble, ruining the texture.
- Stir the vanilla extract, lemon zest, and lemon juice into the cooled butter‑sugar mixture. The citrus will brighten the batter, giving each bite a fresh zing. Be careful not to over‑whisk; a few stirrings are enough to incorporate the flavors.
- In a separate bowl, sift together the all‑purpose flour, baking powder, and salt. Sifting ensures there are no lumps and that the leavening agent is evenly distributed. This step is critical for achieving a tender crumb; clumps can result in uneven baking.
- Add the dry flour mixture to the wet batter in two portions, folding gently after each addition. The batter should be thick but pourable; if it’s too stiff, add a tablespoon of milk or water to loosen it. Overmixing can develop gluten, leading to tough bars.
- Fold in the shredded coconut until evenly distributed. The coconut adds texture and a subtle nutty flavor that complements the lemon. If you prefer a more pronounced coconut taste, add an extra quarter cup.
- Pour the batter into the prepared pan, spreading it evenly with a spatula. Press the batter down slightly to remove any air pockets. The edges should be level with the pan’s rim.
- Bake for 25–28 minutes, or until a toothpick inserted near the center comes out with a few moist crumbs. The top should be golden brown, and the edges will start to pull away from the parchment. Avoid overbaking; the bars should remain slightly soft in the middle.
- Remove from oven and let cool in the pan on a wire rack for 10 minutes. This resting period allows the bars to set and makes slicing easier. While still warm, drizzle the lemon glaze over the top. The glaze will set into a glossy sheen as it cools.
Insider Tricks for Flawless Results
The Temperature Rule Nobody Follows
Many bakers think 350°F is the universal baking temperature, but for blondies, a slightly lower temperature of 330°F can yield a more even bake. Lower heat allows the edges to set without over‑browning, while the center stays moist. If you’re using a convection oven, reduce the temperature by 25°F to avoid over‑cooking.
Why Your Nose Knows Best
Before you even touch the oven, sniff the batter after you’ve added the lemon zest and juice. A bright citrus scent indicates the flavors are well‑balanced. If the scent feels muted, give the batter a gentle stir; the citrus oils will redistribute.
The 5‑Minute Rest That Changes Everything
After removing the blondies from the oven, let them rest in the pan for exactly five minutes before transferring to a wire rack. This brief pause lets the structure set, reducing crumbly edges and making slicing smoother. Skipping this step often results in bars that crumble when you try to cut them.
The Glaze Trick
When preparing the glaze, whisk the powdered sugar and lemon juice until smooth, then add a teaspoon of melted butter for a silky finish. The butter thickens the glaze, giving it a richer mouthfeel and a more polished appearance. If you prefer a lighter glaze, omit the butter and use just powdered sugar and juice.
The Coconut Toast
Toast shredded coconut in a dry skillet over medium heat until golden brown. The toasted coconut releases oils that deepen its flavor and provide a satisfying crunch. If you use pre‑toasted coconut, you can skip this step, but the bars will have a milder coconut taste.
The Cooling Trick
Let the cooled bars rest on a wire rack for at least 10 minutes before glazing. The heat from the bars will caramelize the glaze, creating a glossy, slightly caramelized finish. If you glaze immediately, the glaze may not set properly and will appear dull.
Creative Twists and Variations
This recipe is a playground. Here are some of my favorite ways to switch things up:
Coconut Lime Bliss
Swap the lemon zest and juice for lime zest and juice. The lime adds a sharper, green brightness that pairs wonderfully with coconut. Serve with a drizzle of honey for extra sweetness.
Chocolate Coconut Swirl
Fold in a handful of dark chocolate chips or swirl a tablespoon of melted chocolate into the batter before baking. The chocolate adds richness and a subtle bittersweet contrast to the citrus. The result is a decadent, multi‑layered flavor.
Nutty Banana Blend
Add a ripe banana, mashed until smooth, into the batter. The banana brings natural sweetness and moisture, reducing the need for extra sugar. The coconut and banana together create a tropical, dessert‑like experience.
Almond Butter Crunch
Replace half the butter with almond butter and sprinkle slivered almonds on top before baking. The almond butter adds a nutty depth, while the almonds provide a satisfying crunch. This variation is perfect for those who love a nutty twist.
Raspberry Lemon Burst
Fold in a cup of fresh raspberries into the batter. The berries add a pop of color and a tart flavor that pairs beautifully with the lemon. The resulting bars have a vibrant, fruity appearance.
Spiced Coconut Delight
Add a pinch of ground ginger and a dash of cinnamon to the dry ingredients. The spices warm the flavor profile and complement the coconut. This version is especially cozy during cooler months.
Storing and Bringing It Back to Life
Fridge Storage
Store the cooled blondies in an airtight container at room temperature for up to 4 days. The airtight seal prevents the bars from drying out, maintaining their chewiness. If you’re in a humid climate, place a paper towel in the container to absorb excess moisture.
Freezer Friendly
Wrap individual bars or the whole sheet in plastic wrap, then place in a freezer‑safe bag. They’ll keep for up to 3 months. When ready to enjoy, let them thaw at room temperature for 30 minutes, then finish with a quick glaze drizzle if desired.
Best Reheating Method
To reheat, place a bar in a microwave on medium power for 10–15 seconds, or warm in a 350°F oven for 5 minutes. Add a tiny splash of water to the pan before reheating to create steam, which helps restore moisture and prevents the bars from becoming dry. Serve warm for the ultimate texture.